What's new in 1.4
From World Wind Wiki
| Revision as of 23:00, 3 January 2007 (edit) Bull (Talk | contribs) (→Enabling Atmospheric Scattering) ← Previous diff |
Revision as of 23:06, 3 January 2007 (edit) (undo) Bull (Talk | contribs) (→Sun shading and Atmospheric Scattering) Next diff → |
||
| Line 4: | Line 4: | ||
| [[Image:WW-desertsun.jpg|left|thumb|500px|figure 1 - Sun shading + Atmospheric scattering]] | [[Image:WW-desertsun.jpg|left|thumb|500px|figure 1 - Sun shading + Atmospheric scattering]] | ||
| <br style="clear:both;"> | <br style="clear:both;"> | ||
| - | <b>These features require a modern PC with a good 3D graphics card, as a general rule if your computer cannot run the latest 3D games such as Oblivion then it probably won't be able to handle these features.</b> | + | <b>These features require a modern PC with a good 3D graphics card, as a general rule if your computer cannot run the latest 3D games such as Oblivion or Half life 2 then it probably won't be able to handle these features.</b> |
| ===Enabling Sun shading=== | ===Enabling Sun shading=== | ||
Revision as of 23:06, 3 January 2007
This page will give a brief introduction to World Wind 1.4, and explain how to activate the most popular and useful new features. For a more comprehensive list see World Wind New Features 1 3 6-1 4.
Contents |
Sun shading and Atmospheric Scattering
These features require a modern PC with a good 3D graphics card, as a general rule if your computer cannot run the latest 3D games such as Oblivion or Half life 2 then it probably won't be able to handle these features.
Enabling Sun shading
Sun Shading applies a realistic lighting effect to the imagery shown in World Wind.
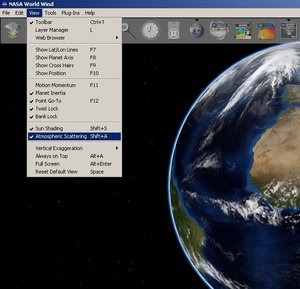
- To enable Sun Shading either navigate to the 'View' menu and click 'Sun Shading' (see figure 2) or press Shift+S.
Enabling Atmospheric Scattering
Atmospheric Scattering gives World Wind an Atmosphere, and gives realistic sunsets and sunrises.
- To enable Atmospheric Scattering either navigate to the 'View' menu and click 'Atmospheric Scattering' (see figure 3) or press Shift+A.
Advanced options
CPU/GPU rendering
This lets you select either CPU or GPU (Graphics card) rendering for Atmospheric Scattering. CPU rendering is more accurate but needs a more powerful CPU and can slow your system down considerably, GPU rendering is faster but requires a modern graphics card with Pixel Shader 2.0 support.
- To enable GPU rendering navigate to the 'Tools' menu and click 'Options' (see figure 4), then navigate to the 'Atmosphere' section, and from the drop down menu next to 'ForceCpuAtmosphere' select 'False' (see figure 5), you can then close the options dialog box.
Sun Light Control
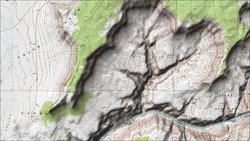
This Dialog box lets you manually alter the Sun's position, by default the Sun's position is calculated accurately based on your system clock. The manual placement option is especially useful for creating shaded relief maps from layers like the USGS topographic and Virtual Earth road maps.
- To open the dialog box navigate to the 'Tools' menu and click 'Sunlight control...' (see figure 8), the dialog box will then open (see figure 9), moving the sliders allows manual positioning of the Sun.
Virtual Earth
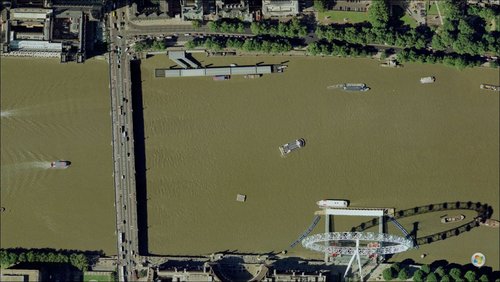
The Virtual Earth plug-in gives World Wind users the ability to view imagery from Microsoft's local.live.com website.
Please note this imagery is owned by Microsoft and may only be used for non-commercial purposes. Any other use must be coordinated with the Microsoft Virtual Earth team. All imagery obtained using this plug-in is copyrighted and may not be redistributed in any form.
Loading and using the plug-in
- To load the plug-in click 'Load/Unload...' in the Plug-Ins menu (see figure 11). Then from the dialog box click 'Virtual Earth Plugin' (you may have to scroll down a bit), and press the 'Load' button (see figure 12), the indicator next to 'Virtual Earth Plugin' should now change to green, now close the dialog box.
- To Change the options in the plug-in click the toolbar icon (see figure 13), a dialog box with several options is then displayed (see figure 14). From the dialog box you can turn the imagery on or off with the 'Layer On' tick box, select which type of imagery you would like to view, Road (Maps), Aerial (photographic type imagery) or Hybrid (a mixture of both), you can also press 'Locate Me' button to have World Wind move the globe to your current location (this is very approximate and may be wrong by several miles), press ing the 'Open in live.local.com' will cause your web browser to open the location you are currently viewing in Microsoft's local.live.com. The 'starting zoom level' slider controls when Microsoft imagery starts to show in World Wind, a lower number causes imagery to load at a higher altitude (when you are zoomed further out).
Time Controller
The Time Controller accurately sets the Suns position when using Sun Shading, by default this is set to your current system clock (so if it is dark outside the World Wind globe may also appear dark), using the Time Controller you can speed up or even reverse the Sun's movement.
Using the Time Controller
- To open the Time Controller widget click the clock icon in World Wind's toolbar (see figure 16).
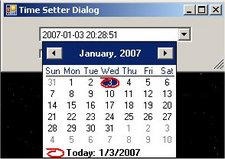
- The Time Controller widget (see figure 17) has several buttons to control the Sun. The 'Play' button starts the Sun moving, the 'Pause' button freezes the Sun's position, the two arrows control the direction of time, repeated pressing of either button will increase or decrease the Suns rotation speed, the 'C' button resets the Time Controller to it's default speed and time, the 'x' button closes the widget, and the 'Clock' button opens a form (see figure 18) which lets you set the Suns position to a specific time and date.
- The Time Controller widget also displays useful information, the first is the date that World Wind is currently set to, below this is the time World Wind is currently set to, in brackets next to the time is the current zoom or speed, x1 means the Sun moves at the actual speed it would move in real life, x100 means it is moving at 100 times real speed, -100 means it is moving backwards at 100 times real speed.


